Korea Travel Essentials: 5 Things to Set Up Before You Arrive

What this series covers, and why pre-arrival setup gets confusing
Five things are worth setting up before you land in Korea: a local map app, a T-money transit card top-up plan, the airport roaming counter hours, a taxi app, and the e-Arrival Card. Every number and rule below comes from four official screens captured on 2026-10-07 — VisitKorea's Essential Transit Apps, Tmoney's User Guide (Foreigner), Incheon Airport's Convenience & Public Facilities list, and www.e-arrivalcard.go.kr. Three of the five already have a full step-by-step post in this series; the other two are summarized here.
One limit up front: SIM plans, data pricing and taxi fares were not shown on any of these screens, so no prices appear anywhere in this guide.
| Item | Official screen checked | Full guide |
|---|---|---|
| Map app (Naver Map) | VisitKorea, Essential Transit Apps | Part 1, published |
| T-money top-up | Tmoney, User Guide (Foreigner) | Coming in this series |
| Airport roaming counter | Incheon Airport, Telecommunication / Internet | Coming in this series |
| Taxi app (k.ride) | VisitKorea, Essential Transit Apps | Part 4, published |
| e-Arrival Card | www.e-arrivalcard.go.kr | Part 5, published |
Step 1. Install a local map app before you leave home
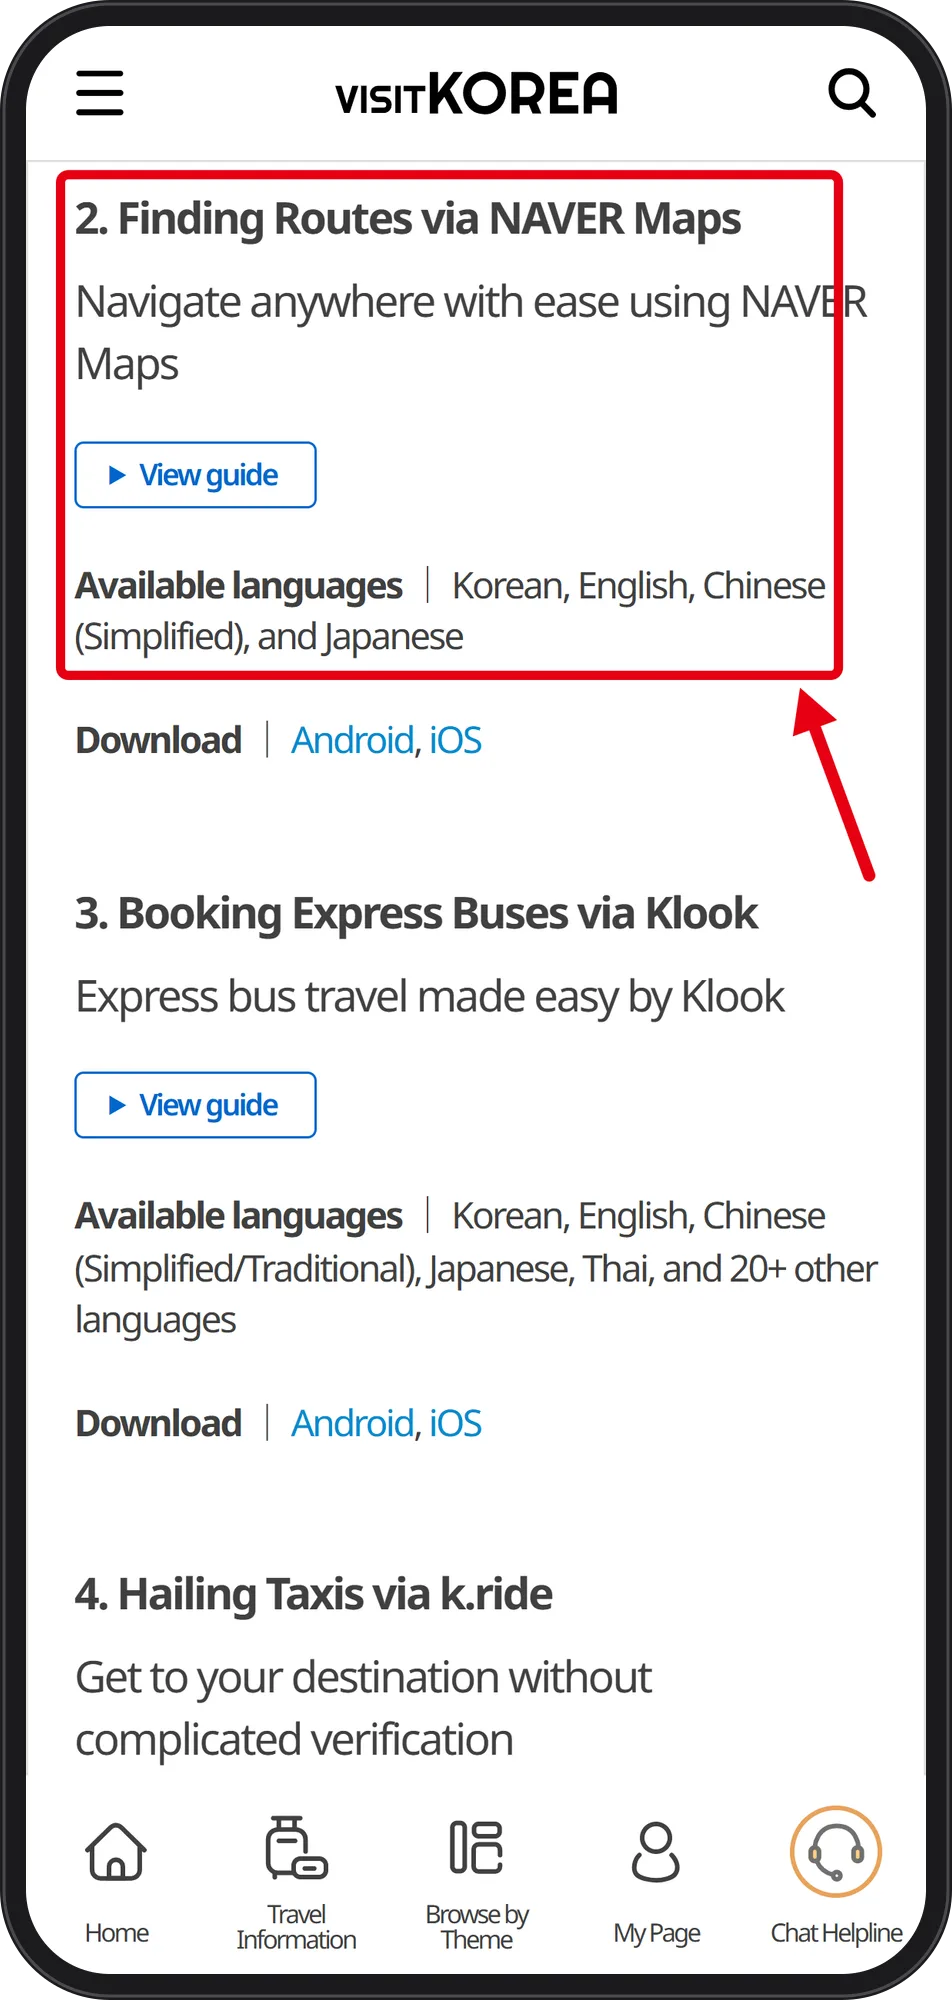
VisitKorea's Essential Transit Apps page lists it as "2. Finding Routes via NAVER Maps — Navigate anywhere with ease using NAVER Maps." The same entry shows "Available languages | Korean, English, Chinese (Simplified), and Japanese" and "Download | Android, iOS."
 Source: VisitKorea, Essential Transit Apps (captured Oct 7, 2026)
Part 1 of this series compared the same Seoul walking search in two apps: one returned "Can't seem to find a way there," while Naver Map returned a Myeongdong Station → YTN Seoul Tower route of 45 min / 1.6 km. Treat this as adding one more local map app, not replacing the one you already use. The English-language setting path is in Korea Travel Essentials #1: Download Naver Map and Switch It to English.
Step 2. Decide your T-money top-up plan before the first subway ride
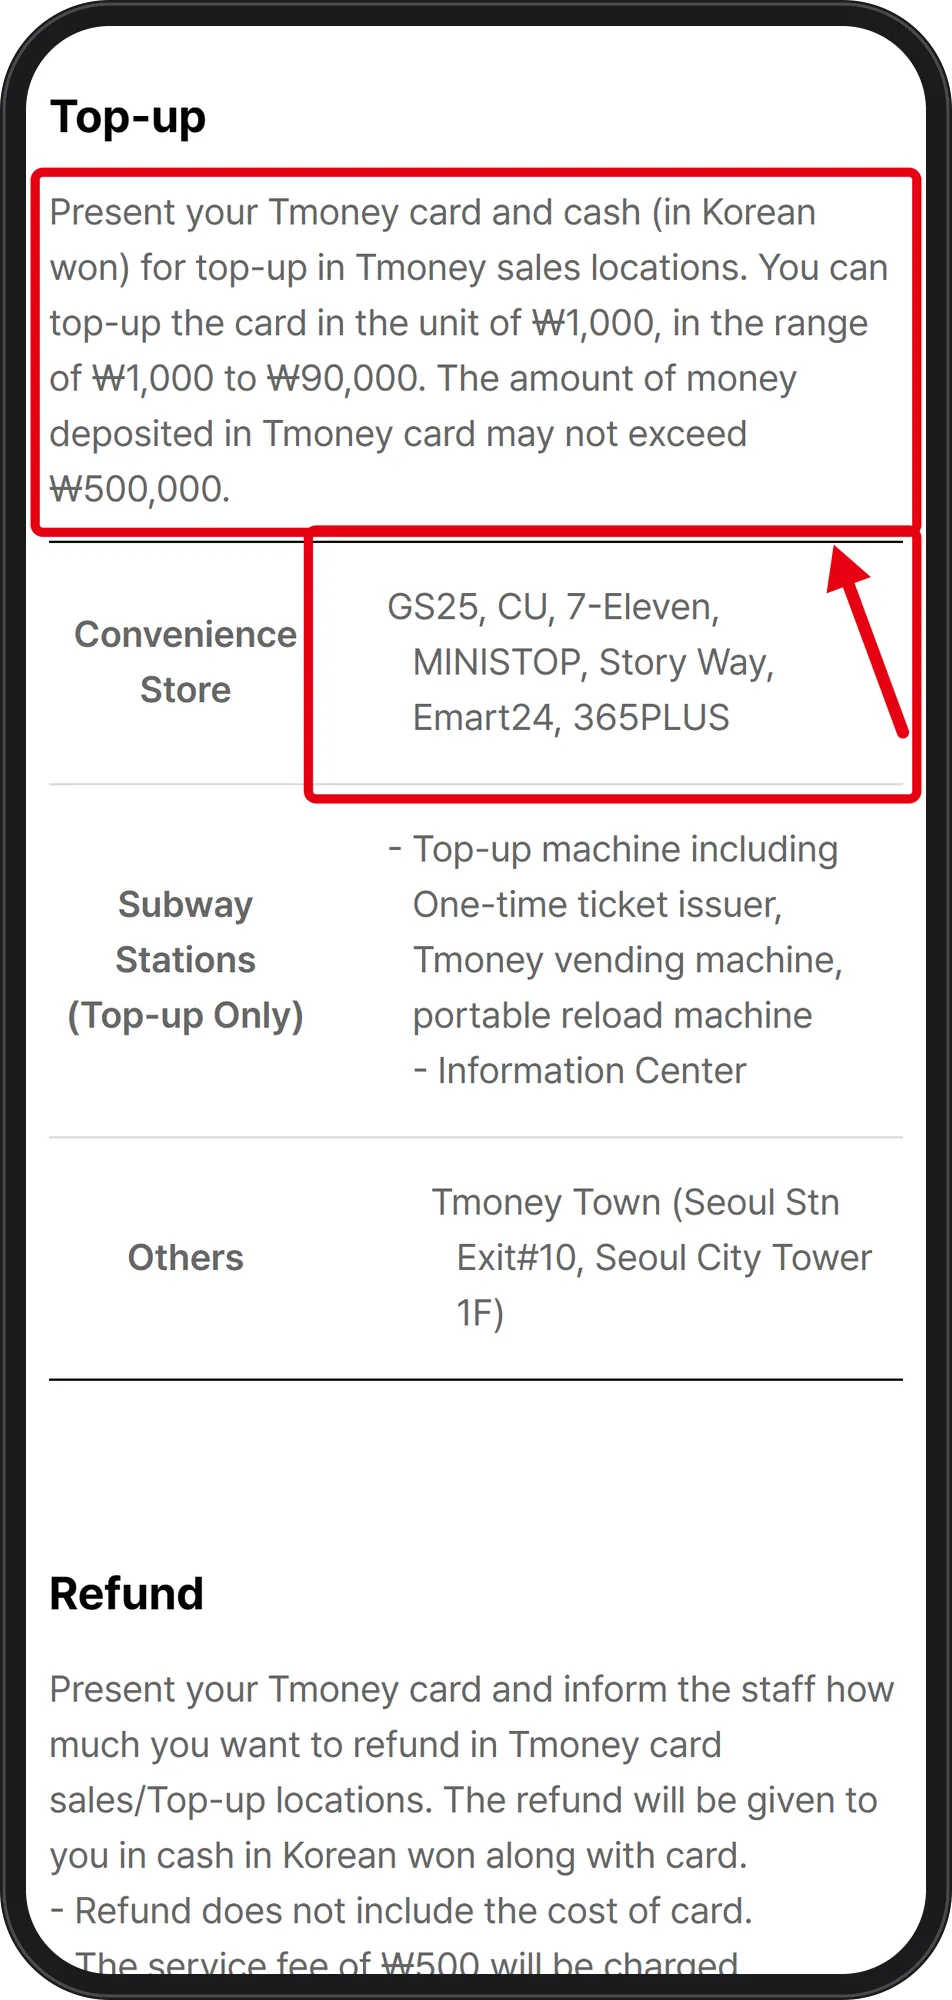
The Tmoney User Guide (Foreigner) states you present your Tmoney card and cash in Korean won at Tmoney sales locations. Top-ups go in ₩1,000 units, in the range ₩1,000 to ₩90,000, and the amount on the card may not exceed ₩500,000.
 Source: Tmoney, User Guide (Foreigner) (captured Oct 7, 2026)
Convenience stores listed: GS25, CU, 7-Eleven, MINISTOP, Story Way, Emart24, 365PLUS. Subway stations are top-up only — one-time ticket issuer, Tmoney vending machine, portable reload machine, and the Information Center — plus Tmoney Town at Seoul Station Exit 10, Seoul City Tower 1F. Refunds are handled at sales and top-up points with a ₩500 fee, and the card price itself is not refunded. Transfer discounts apply up to 4 transfers a day, within 30 minutes (1 hour between 9 p.m. and 7 a.m.). A step-by-step guide is coming in this series.
Step 3. Know the airport roaming counter hours before you book a late flight
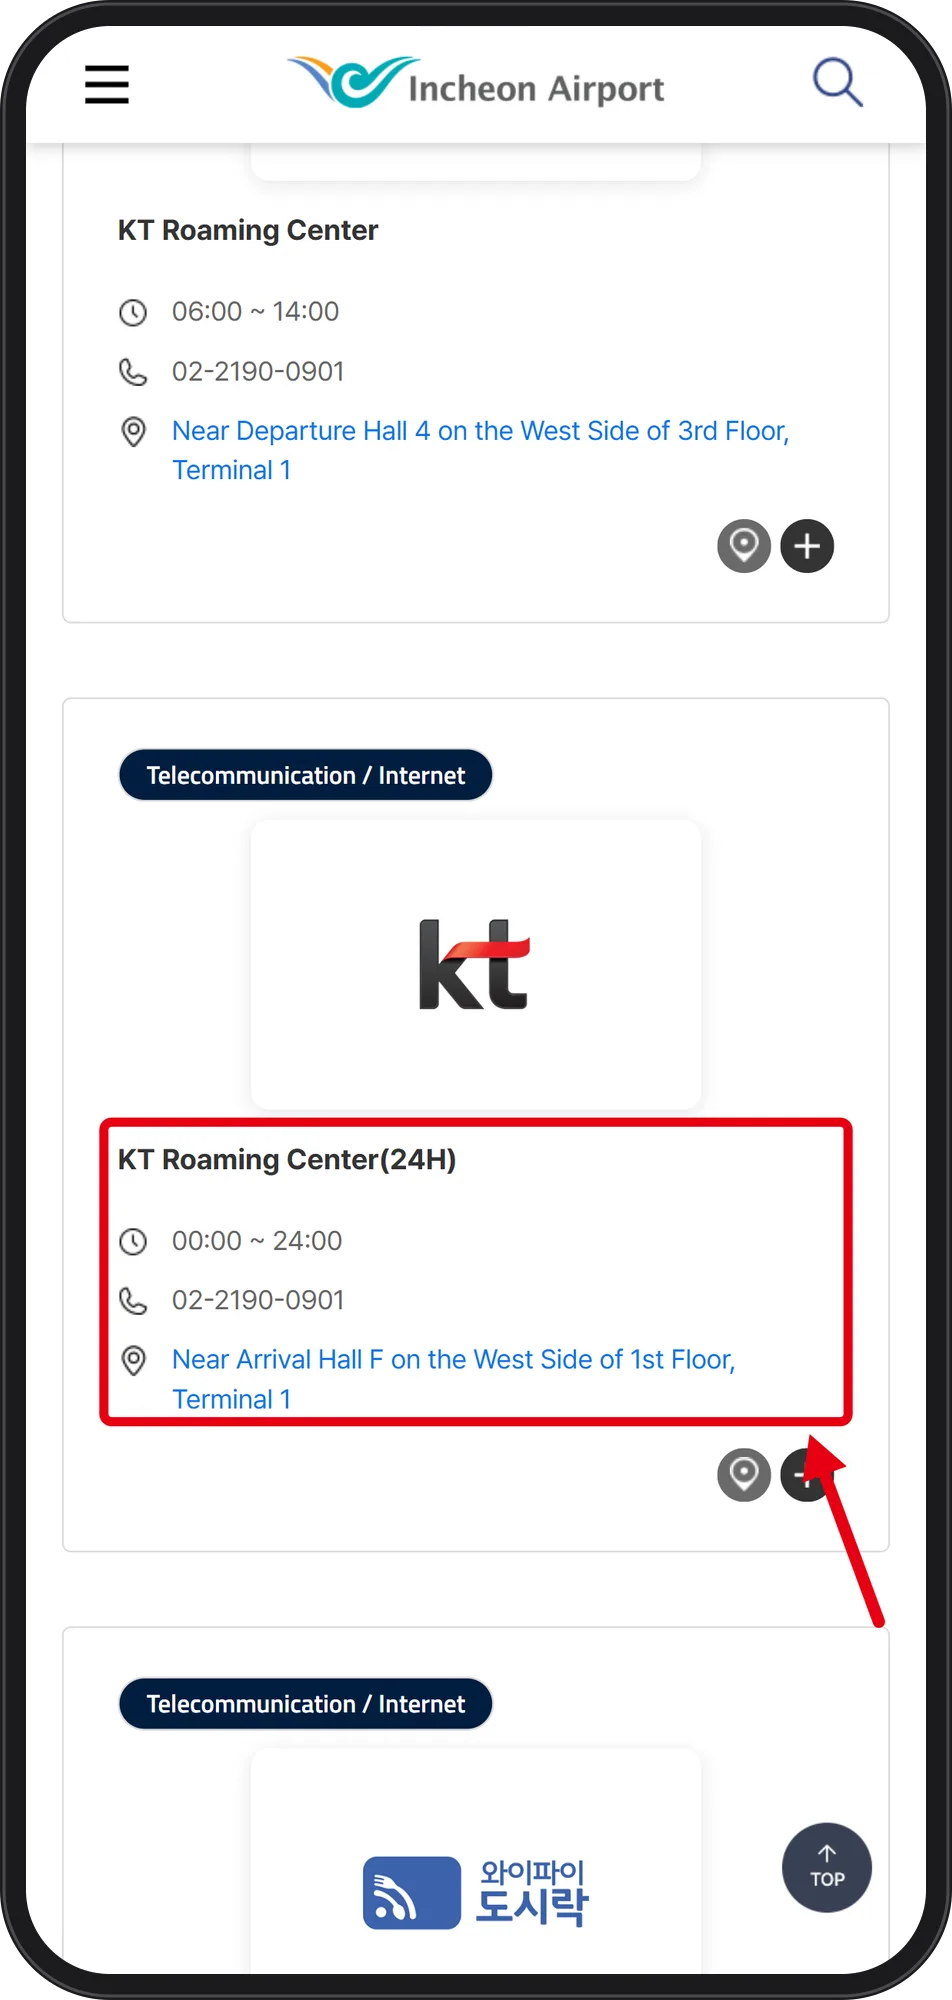
Incheon Airport's Telecommunication / Internet list shows KT Roaming Center (24H), 00:00–24:00, near Arrival Hall F on the west side of the 1st floor, Terminal 1.
 Source: Incheon Airport, Convenience & Public Facilities (captured Oct 7, 2026)
The same list also shows KT Roaming Center 06:00–14:00 near Departure Hall 4, west side 3rd floor; LG U+ Roaming Center 06:00–22:00 near Arrival Hall A, east side 1st floor; and SK Telecom Roaming Center 06:00–22:00 near Departure Hall 4, west side 3rd floor. Note the split: the departure-side desks in this list sit on the 3rd floor, the arrival-side ones on the 1st. SIM and eSIM prices and activation steps were not on this screen, so they are not covered here; a step-by-step guide is coming in this series.
Step 4. Add a taxi app that works without a Korean verification step
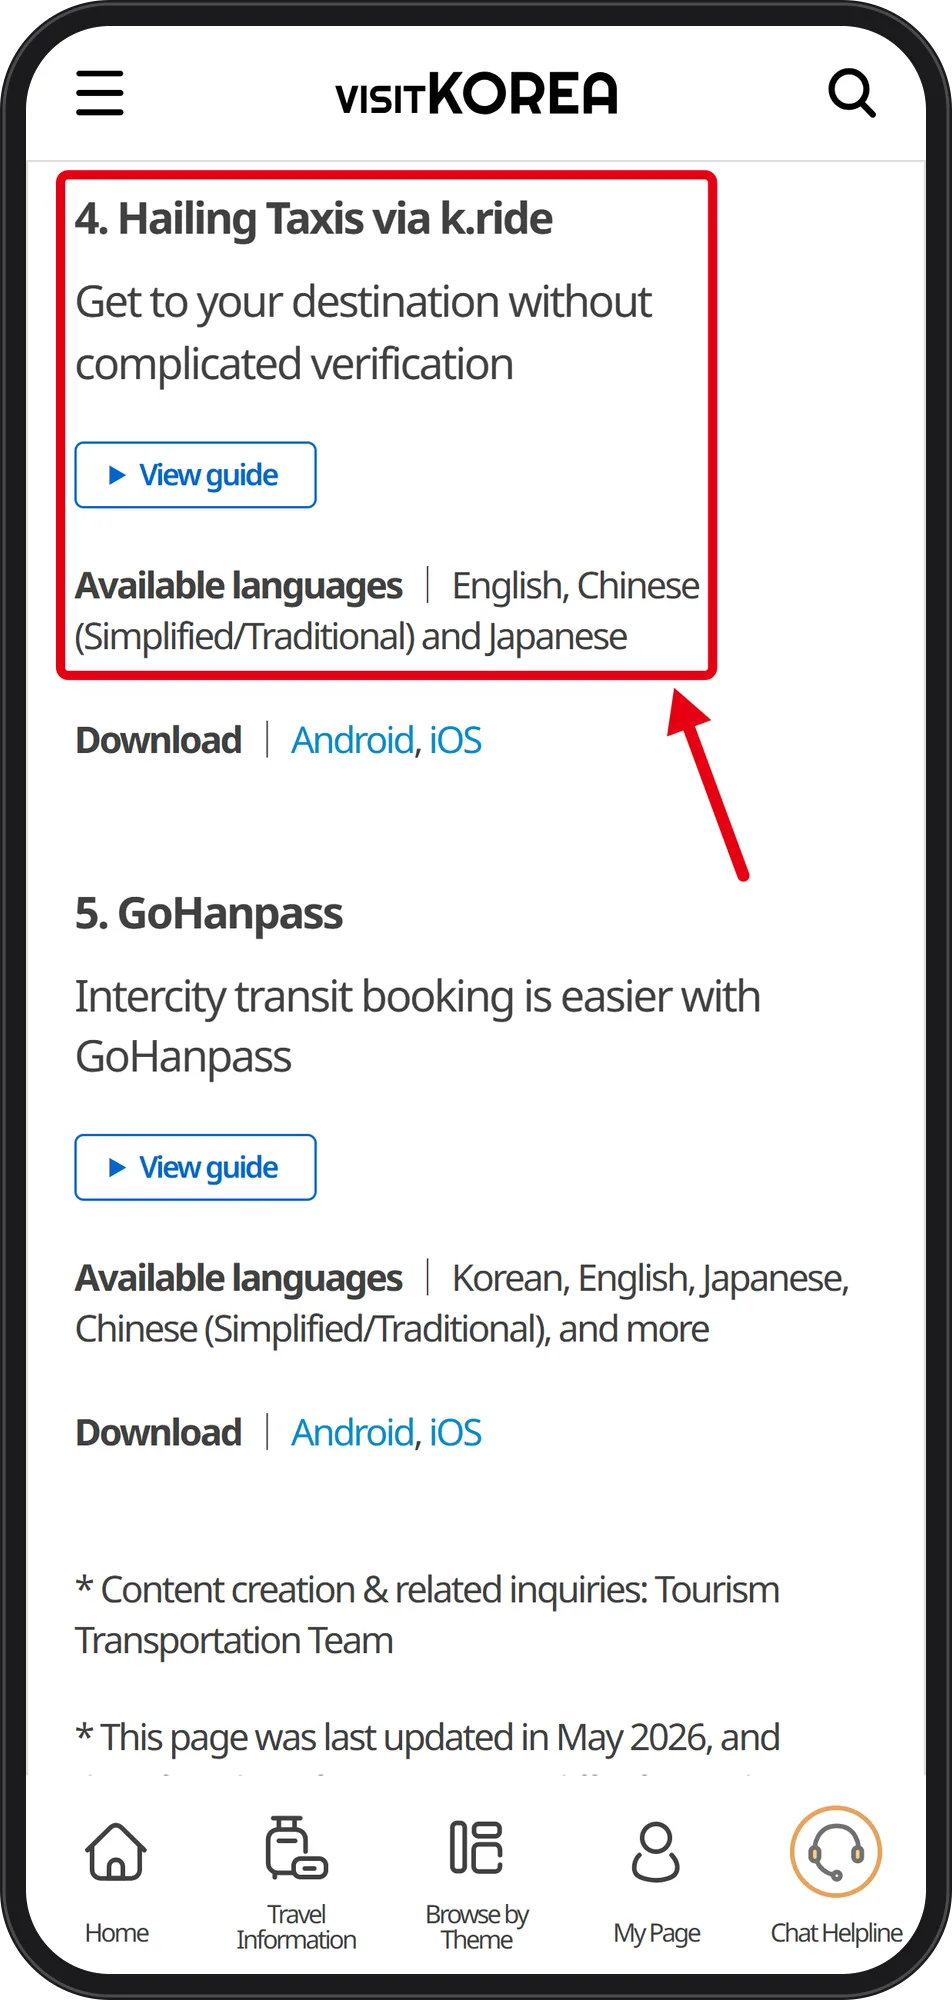
VisitKorea's Essential Transit Apps page lists "4. Hailing Taxis via k.ride — Get to your destination without complicated verification," with "Available languages | English, Chinese (Simplified/Traditional) and Japanese" and "Download | Android, iOS."
 Source: VisitKorea, Essential Transit Apps (captured Oct 7, 2026)
Directly below it, the same page lists GoHanpass for intercity transit booking. Fares were not shown on this screen, so this guide does not state them. In the app itself, the payment screen marks Korea-issued cards as not accepted and lists PayPal, foreign credit/debit cards, Alipay+ and WeChat Pay — the full setup is in Korea Travel Essentials #4: Set Up k.ride for Taxis and Add a Foreign Card.
Step 5. File the e-Arrival Card on the official site, then run the pre-flight checklist
The front page of www.e-arrivalcard.go.kr, checked 2026-10-07 at 23:37, states "수수료 없이 온라인으로 간편하게" (file online easily with no fee) and "대한민국 도착 3일 전부터 신고가능" (reporting is possible from 3 days before arrival in Korea). The site also has an e-Arrival card navigator that tells you whether you are required to file at all — run that first.
Since the official page states there is no fee, do not pay a third party for this step, and confirm the address ends in go.kr before entering passport details. The full walkthrough is in Korea e-Arrival Card: Check If You Need One, Then File on the Official Site.
Pre-departure checklist
- Local map app installed and set to English
- T-money top-up plan decided (cash in won, ₩1,000 units)
- Roaming counter hours noted against your landing time
- Taxi app installed
- e-Arrival Card filed inside the 3-day window


